顯示具有 UNITY 3D 標籤的文章。 顯示所有文章

2015年8月26日 星期三

UNITY3D - 用程式更改animation關鍵影格 change animation clip property value by script

有時候我們會需要物件的移動數值是可調整的,但可能因為架構上大量使用mecanim(animator)導致難以改用程式去控制物件移動。
這時候我們可以用程式更改animator所讀取的animation clip,將裡面的關鍵影格資訊改成所需要的數值。
善加利用state machine加上可變動的animation,mecanim的使用彈性就更高了。

所用到的function : AnimatorOverrideController, AnimationClip.SetCurve, AnimationClip.AddEvent

AnimationClip.SetCurve只會新增或蓋掉原本clip中有設定的property,要刪除某個property則在第四個參數(AnimationCurve)傳入null即可。

※注意,AnimationClip.SetCurve只在Editor上有效!

Runtime會更改專案中animation clip的寫法
//Change transform.localPosition.x move 0~100
//Change sprite.color.a 1~0
//Add event call Ready and pass parameter on 1sec
//gameObject structure:  gameObject:transform
//                           |
//                           --- child:SpriteRenderer
void ChangeAnimCurve () {
    Animator _animator = GetComponent();
    AnimatorOverrideController myOverrideController = new AnimatorOverrideController();
    myOverrideController.runtimeAnimatorController = _animator.runtimeAnimatorController;
    AnimationClip clip = myOverrideController["clipname"];
    clip.SetCurve("", typeof(Transform), "localPosition.x", new AnimationCurve(new Keyframe(0f, 0f), new Keyframe(1f, 100f)));
    clip.SetCurve("child", typeof(SpriteRenderer), "m_Color.a", new AnimationCurve(new Keyframe(0f, 1f), new Keyframe(1f, 0f)));
    AnimationEvent evt = new AnimationEvent ();
    evt.functionName = "Ready";
    evt.intParameter = 1;
    evt.time = 1f; //make sure there got a keyframe
    clip.AddEvent (evt); //events added with AddEvent will only persist until play mode is exited of player is quit.
    _animator.runtimeAnimatorController = myOverrideController;
}


不更改專案中animation clip的寫法
//Change transform.localPosition.x move 0~100
//Change sprite.color.a 1~0
//Add event call Ready and pass parameter on 1sec
//gameObject structure:  gameObject:transform
//                           |
//                           --- child:SpriteRenderer
void ChangeAnimCurve () {
    Animator _animator = GetComponent();
    AnimatorOverrideController myOverrideController = new AnimatorOverrideController();
    myOverrideController.runtimeAnimatorController = _animator.runtimeAnimatorController;
    AnimationClip clip = new AnimationClip();
    clip.SetCurve("", typeof(Transform), "localPosition.x", new AnimationCurve(new Keyframe(0f, 0f), new Keyframe(1f, 100f)));
    clip.SetCurve("child", typeof(SpriteRenderer), "m_Color.a", new AnimationCurve(new Keyframe(0f, 1f), new Keyframe(1f, 0f)));
    AnimationEvent evt = new AnimationEvent ();
    evt.functionName = "Ready";
    evt.intParameter = 1;
    evt.time = 1f; //make sure there got a keyframe
    clip.AddEvent (evt); //events added with AddEvent will only persist until play mode is exited of player is quit.
    myOverrideController["clipname"] = clip;
    _animator.runtimeAnimatorController = myOverrideController;
}

2014年1月20日 星期一

Unity 3D - Facebook SDK for Unity測試心得

Facebook推出SDK for Unity已經有段時間了(不過好像一直在beta版?)...

之前的專案因為Facebook SDK還不見蹤影而使用了prime31的SocialNetwork plugin來開發,現在總算有閒可以來測測這東西了。

在設定上Facebook參考了(我覺得啦...)prime31的設定方法,也就是用個asset檔來記錄設定,但Facebook做得更好的是在Unity介面上只要設定好Facebook App Id就幾乎大功告成了,其他需要輸入到Facebook介面上的資料也很貼心的整理好等著複製,甚至貼心到連Debug Android Key Hash也抓好了!

但發生了件令人費解的事情是Web版可以正常登入Facebook帳號也可以發文章,偏偏Android卻怎樣也無法登入...

查了許久才發現Facebook SDK自動生成的AndroidManifest檔案裡面activity android:name="com.unity3d.player.UnityPlayerNativeActivity"沒有被替換成com.facebook.unity.FBUnityPlayerActivity,只要修改好這點就可以正常使用無誤了。

2014年1月16日 星期四

UNITY3D - Time.timeScale

在遊戲中常會用到遊戲暫停的功能,Unity也提供了相關的功能就是將Time.timeScale設0。
但相信很多人會搞不清楚Time.timeScale會影響哪些東西,以下就來列一下會被Time.timeScale影響的部分。

1.FixedUpdate - 官方文件也聲明了Time.timeScale爲0時FixedUpdate不會被呼叫。
2.Rigidbody - Rigidbody的物理運算跟FixedUpdate有連帶關係,自然也就不會動作。
3.Time.time, Time.deltaTime, Time.fixedDeltaTime這些跟timeScale息息相關的數值也一樣逃不了,Time.time會停止、deltaTime會變0。
4.Animation - 非常依賴time的功能當然也就不會動了。
5.WaitForSeconds - 一樣是依賴time來做運算處理,那就一樣會停止運作。
6.WaitForFixedUpdate - FixedUpdate都不動了,那自然這也會停止運作了。

2013年11月14日 星期四

UNITY3D - Unity遊戲開發基礎Q&A

因為換工作交接的關係,才讓我意識到一般的程式設計人員要理解Unity有蠻大的障礙,如果有開發過遊戲或許還好一點,但如果只開發過一般應用程式的話就幾乎要重新理解觀念了。

Q1.Unity開發的程式進入點是什麼?
A1.Unity並沒有所謂的主程式進入點,遊戲以“場景”為一個主體,並且“場景”中有多個“遊戲物件”,每個“遊戲物件”內有一或多個“行為元件”。“行為元件”內才有所謂的起始進入點Awake,但要注意的是除非有經過設定每個“行為元件”的執行順序,不然在執行時“行為元件”的執行順序是不一定的。

Q2.寫好的Class怎麼使用呢?
A2.Unity內新增的程式檔案預設都會繼承MonoBehaviour,只要繼承MonoBehaviour就可以將這程式附加到“遊戲物件”上成為“行為元件”。只有在場景中的行為元件上的Awake、Start...等等MonoBehaviour的函式才會被執行。

Q3.MonoBehaviour有哪些函式?在什麼情況下用?
A3.通常最常用的是
Awake 、Start、Update還有碰撞相關的OnCollisionEnter、OnTriggerEnter,Awake 、Start用於初始化(Awake會比Start先執行),Update是每個Frame會執行一次,其他詳細的MonoBehaviour請參閱這裡。

Q4.Frame是什麼意思?
A4.在遊戲中是指程式執行頻率也就是FPS(是Frames Per Second不是First Person Shooter),意味著一秒鐘執行多少個Frame。

Q5.有辦法知道每Frame的實際執行耗時嗎?
A5.Unity有提供Time.deltaTime可以取得每Frame實際耗時。

Q6.設定行為元件的enable?
A6.在Unity Editor上行為元件的勾選可以控制元件的enable,或者也可以在程式中直接設定enable。enable會影響Start、Update是否執行,使用時需多加注意。

Q7.遊戲物件的父子物件關係?
A7.遊戲物件可以跟別的遊戲物件成為父子物件關係,子物件會隨著父物件移動。

Q8.如何執行別的行為元件的函式?
A8.1)宣告一該行為元件型態變數,并在Unity Editor上將指定的行為元件設定到變數上,或者是在程式裡用Object.FindObjectOfType(在別的遊戲物件上)、GetComponent(在本身的遊戲物件上)並執行函式。2)將該函式宣告為static,但並不建議此方法,除非是用在類似整個遊戲狀態管理上。3)使用Unity的SendMessage機制,SendMessage系列有三種,1.SendMessage(string methodName):對本身遊戲物件上的所有行為元件(不含父物件及子物件上的)通知執行跟methodName同名的函式;2.SendMessageUpwards(string methodName):對本身遊戲物件及父物件上的所有行為元件(不含子物件上的)通知執行跟methodName同名的函式;3.BroadcastMessage(string methodName):對本身遊戲物件及子物件上的所有行為元件(不含父物件上的)通知執行跟methodName同名的函式。

Q9.Prefab機制?
A9.當“遊戲物件”綁上很多“行為元件”後,要怎麼去重複利用這個“遊戲物件”呢?於是Prefab機制就出現了,將設定好的“遊戲物件”拖曳到Project View就可以將它變成Prefab。只要將Prefab拖曳到場景中就可以變成已經設定好的“遊戲物件”,這裡要注意的是Prefab跟產生出來的“遊戲物件”有父子關係。只要Prefab上的設定一更動,所有由此Prefab產生的“遊戲物件”都會更動,但如果是“遊戲物件”更動的話是不會影響Prefab及其它“遊戲物件”。 跟Prefab有關係的“遊戲物件”上會出現這些控制按鈕,Select可以讓你找到此物件的Prefab;Revert會讓此物件的設定回復得跟Prefab一樣;Apply會將此物件的設定覆蓋回Prefab,連帶的會更動到由此Prefab產生出來的其他“遊戲物件”。最後還要注意的是,更動“遊戲物件”上“行為元件”的設定值將會使這設定值被設立旗標(設定值會變粗體),表示此設定值跟Prefab脫鉤,Prefab更動也不會影響到此設定值。


之後有想到什麼再補充上去吧...

2012年10月15日 星期一

UNITY3D - SendMessage多重參數

善用Unity3D內建的SendMessage函式可以讓程式更容易拆解、更好重覆利用,在Component Oriented Design上是很好用的工具。

但SendMessage系列有個缺陷是只能接收單一參數,除非自己將多重參數包成struct、class使用,這樣在使用上也變得無法統一不太便利。

如何改善呢?

試了幾種方法後發現用Hashtable較為合適,且C#或JavaScript皆可使用。按Key來得知所接收的變數該塞在哪?不用像用Array時還要確定變數的位子。

C#

void Start () {
    Hashtable args = new Hashtable();
//想塞什麼型態都可以
    args.Add("string", "i am string"); 
    args.Add("int", 123);
    args.Add("float", 567.89f);
    args.Add("Vector3", new Vector3(1, 2, 3));
    SendMessage("TestMessage", args);
}
void TestMessage (Hashtable args) { //可以直接使用或新建變數接收,個人覺得新建變數接收使用上較為直覺 //接收時須轉型為正確型態     string stringVar = (args.Contains("string")) ? args["string"].ToString() : "";     int intVar = (args.Contains("int")) ? (int)args["int"] : 0;     float floatVar = (args.Contains("float")) ? (float)args["float"] : 0.0f;     Vector3 vectorVar = (args.Contains("Vector3")) ? (Vecotr3)args["Vector3"] : Vector.zero; }


========================================

JavaScript


function Start () {
    var args : Hashtable = new Hashtable();

//想塞什麼型態都可以

    args.Add("string", "i am string"); 
    args.Add("int", 123);
    args.Add("float", 567.89f);
    args.Add("Vector3", new Vector3(1, 2, 3));
    SendMessage("TestMessage", args);
}
function TestMessage (args : Hashtable) {
    string stringVar = (args.Contains("string")) ? args["string"] : "";
    int intVar = (args.Contains("int")) ? args["int"] : 0;
    float floatVar = (args.Contains("float")) ? args["float"] : 0.0f;
    Vector3 vectorVar = (args.Contains("Vector3")) ? args["Vector3"] : Vector.zero;
}

2012年8月14日 星期二

UNITY3D - JavaScript "in" 的妙用

前言:這裏指的Javascript是指Unity所用的,而非一般所用的Javascript,一般所用的Javascript無法使用in來當Contains使用。

C# 的ArrayList有Contains函式可以用來檢查元素是否存在於這個Array裡,但是JavaScript裡的Array就沒有Contains函式可以使用,難道只能用迴圈來檢查了嗎?
不!JavaScript有提供很棒的"in"關鍵字供我們使用,這關鍵字不但容易讓人理解而且功能強大,如:

var arr : int[] = [1, 2, 3, 4, 5];
for(var i : int in arr)
{
    Debug.Log(i); //1 2 3 4 5
}

像C#的foreach用法


var arr : Array = new Array(1, 2, 3, 4, 5);
if(3 in arr)
{
    Debug.Log(true);
}
else
{
    Debug.Log(false);
}

我們想要的Contains功能


var arr : int[] = [1, 2, 3, 4, 5];

if(3 in arr)
{
    Debug.Log(true);
}
else
{
    Debug.Log(false);
}

更棒的是BuildInArray也適用這個做法,C#的話似乎就必須用迴圈去找了。


if (foo == "bar" || foo == "foobar" || foo == "foo" )
{
 //...
}
// can be written as
if (foo in ["bar", "foobar", "foo"])
{
 //...
}

超棒的是不用再寫一堆||了,不但易讀易懂更易寫。

還有甚麼更好的應用就等大家分享了。


2012年7月23日 星期一

「轉載」Unity3d动画脚本 Animation Scripting(深入了解游戏引擎中的动画处理原理)


也許這一篇文章的內容有點枯燥,但我要說的是如果你想深入的了解遊戲引擎是如何處理動畫片斷或者素材並
讓玩家操控的角色動起來栩栩如生,那麼這真是一篇好文章(當然我僅僅是翻譯了一下)


動畫腳本 Animation Scripting
Unity's 動畫系統允許你創建一個漂亮的動畫蒙皮角色. 動畫系統支持動畫融合,混合,添加動畫,步調週期時間同步.動畫層.控制動畫回放的所有方面(時間,速度,混合權重) 每個頂點有1.2.4個骨骼影響的mesh,基於物理系統的布娃娃系統,另外還有程序動畫.為了獲得最佳效果推薦您在製作模型和動畫綁定前閱讀一下Modeling Optimized Characters 章節.


製作一個動畫角色主要包括兩個方面; 在世界中移動和由此產生的動畫. 如果你想了解角色移動相關的更多內容, 請參閱Character Controller page.   實際上角色動畫是由Unity's 腳本界面完成的 .
你可以下載example demos 中預設置好的動畫角色. 當你學完本頁的基礎部分你還可以看一看animation script interface.


如果需要你可以點擊并快速轉到以下主題:
·         Animation Blending    動畫融合
·         Animation Layers      動畫層
·         Animation Mixing       動畫混合
·         Additive Animation      附加動畫
·         Procedural Animation    程序動畫
·         Animation Playback and Sampling   動畫重放和取樣


Animation Blending 動畫融合
在現今的遊戲中Animation Blending是一項保證遊戲動畫順暢過渡的基本的特性.動畫師創建的動畫例如: walk 循環, run 循環, idle原地空閒動畫或射擊動畫.在遊戲的任何時間點你都有可能從空閒站立轉換到走動,反之亦然. 當然你不希望兩個不同的動作之間突然跳轉, 你需要動畫平滑過渡.
而這個問題的解決就依賴動畫融合技術. 在Unity中你可以讓同一個角色擁有任意數量的動畫.所有這些動畫融合添加成為一個總的動畫.
首先我們來為一個角色添加兩個動畫原地空閒站立和走動並平滑的使這兩個動畫過渡. 為了使我們在寫腳本時簡單些, 首先我們設置動畫的Wrap Mode為Loop. 然後關閉Play Automatically來讓我們的腳本來獨占動畫的播放.

我們第一個動畫腳本很簡單; 我們需要一些方法來探查角色移動的有多快, 然後在走和站立之間淡入淡出. 在這個簡單的測試中我們使用pre-setup input axes.

function Update () {
   if (Input.GetAxis("Vertical") > 0.2)
       animation.CrossFade ("walk");
   else
      animation.CrossFade ("idle");
}

下面我們來讓這個腳本運行:
1.       創建一個js腳本Assets->Create Other->Javascript.
2.       把代碼拷貝進去
3.       把腳本拖拽給角色character (It needs to be the same GameObject as the animation)
點擊Play 按鈕, 當你按上下鍵時角色會走動,鬆開上下鍵時角色站立不動.

動畫層Animation Layers
層是一個非常有用的概念它可以讓你將動畫片段任意成組並且區分優先順序.
在Unity's動畫系統中, 你可以混合任意數量的動畫片段. 你可以手工分配權重或者直接使用animation.CrossFade(),來自動分配權重.

混合權重混合權重總是在應用前被規格化normalized
比如說我們現在有一個walk cycle 和一個run cycle, 權重都是1 (100%).當unity計算最終動畫時會規格化權重, 這意味著walk佔50% 權重,   run cycle佔50% 權重.

這在大多數情況下都是不錯的, 但當兩個動畫片段同時運行而其中一個權重明顯大於另外一個. 那麼你需要手動調整權重值,但如果你使用動畫層來解決這個問題過程會容易得多.

製作動畫層的範例Layering Example
例如現在你有一個射擊動畫, 一個空閒站立,一個走動循環 . 你需要在走和站兩個動作間持續的淡入淡出(在玩家走動速度的基礎上) 但當玩家射擊時我們只想展示射擊動畫. 因而射擊動畫此時的優先度最高.

為了達到這一目的最簡單的方法是在射擊時簡單的保持walk 和idle動畫. 接下來需要確定shoot animation在一個比idle 和walk更高的層. 這意味著shoot animation 將首先收到混合權重. walk 和idle 只有在shoot animation不使用100% 混合權重的情況下接收權重. 所以當CrossFading the shoot animation in, 權重將從0開始很短時間內到達100%. 在開始階段walk 和idle 層將依然可以收到混合權重但當shoot animation 完全切入時, 他們就收不到權重了.  這才是我們需要的!


function Start () {


// Set all animations to loop 設置所有動畫為循環
   animation.wrapMode = WrapMode.Loop;
// except shooting 除了射擊(不循環)
   animation["shoot"].wrapMode = WrapMode.Once;

//放置idle 和walk 進低一級別的layers  (默認layer 總是0)
// This will do two things這將作兩件事情
// - 當calling CrossFade時,由於shoot 和idle/walk 在不同的layers 中
//   它們將不會影響互相之間的重放.
// - 由於shoot 在高一級的layer, 當faded in 時shoot動畫將替換
   //   idle/walk 動畫 .
   animation["shoot"].layer = 1;

// Stop animations that are already playing停止已經播放的動畫
//(萬一user 忘記的話,自動disable播放)
   animation.Stop();
}

function Update () {
// Based on the key that is pressed,基於按下的鍵
// play the walk animation or the idle animation播放走,站動畫
if (Mathf.Abs(Input.GetAxis("Vertical")) > 0.1)
      animation.CrossFade("walk");
   else
      animation.CrossFade("idle");

   // Shoot射擊
   if (Input.GetButtonDown ("Fire1"))
      animation.CrossFade("shoot");
}


默認情況下animation.Play() 和animation.CrossFade() 將停止或淡出在同一層裡面的動畫. 這是我們在絕大多數情況下需要的.在我們shoot, idle, run 範例中, 播放idle 和run 將不會影響到shoot動畫反之亦然(you can change this behavior(行為) with an optional parameter(任意參數) to animation.CrossFade if you like).

動畫混合Animation Mixing
動畫混合可以讓你縮減你必須為遊戲製作的動畫片斷數量,方法是製作只對身體某個部分起作用的動畫. 這意味著這些動畫可以和其他動畫合併起來一起使用.

如果你想給一個動畫添加animation mixing transform to an animation by calling AddMixingTransform() on the given AnimationState.

混合範例Mixing Example
例如你可能有一個揮手(hand-waving)動畫. 你可能需要讓一個空閒站立(idle)角色或者一個走動(walking)角色來揮手. 如果沒有動畫混合你可能需要製作兩個揮手hand-waving動畫:一個給idle, 一個給walking. 可是, 如果你將揮手(hand-waving)動畫作為一個mixing transform 添加到shoulder transform,揮手動畫將只控制肩膀. 身體餘下部位不受其影響, 下半身會繼續播放idle 或者walk 動畫. 因而你只需要一個揮手(hand-waving)動畫.

/// Adds a mixing transform using a Transform variable
var shoulder : Transform;
animation["wave_hand"].AddMixingTransform(shoulder);

Another example using a path.

function Start () {
// Adds a mixing transform using a path instead
var mixTransform : Transform = transform.Find("root/upper_body/left_shoulder");
animation["wave_h和"].AddMixingTransform(mixTransform);
}

附加動畫 Additive Animations
附加動畫和動畫混合可以讓你縮減為遊戲製作的動畫片斷的數量,並且對面部動畫(facial animations)來說非常重要.
讓我們來看看如果創建一個在跑和轉身時身體可以自動傾斜的角色.
你已經製作好了一個walk 和run循環, 現在你還要製作一個走動左傾( walk-lean-left), 走動右傾(walk-lean-right), 跑左傾(run-lean-left), 跑右傾( run-lean-right)動畫.
這意味著你需要多做4個動畫片斷! 製作這麼多數量的動畫會累死人的. 而附加動畫(Additive animations) 和混合(Mixing) 可以大大減少這些工作量!

附加動畫範例 Additive Animation Example
附加動畫允許你在頂層覆蓋其他所有可能播放的動畫的效果( allow you to overlay the effects of animation on top of any others that may be playing). 當你製作一個附加動畫時, Unity將計算動畫片斷裡的第一幀(first frame)和當前幀(current frame)的差異. 然後它將在所有其他播放的動畫之上應用這個差異(Then it will apply this difference on top of all other playing animations).

現在你只需要製作一個左傾( lean-left) 和右傾( lean-right)動畫. Unity將為此傾斜動畫新建一個層並置於walk, idle 或run循環的層級之上.
下面是代碼Here is the code to make that happen:


private var leanLeft : AnimationState;
private var leanRight : AnimationState;

function Start () {
   leanLeft = animation["leanLeft"];
   leanRight = animation["leanRight"];

// Put the leaning animation in a separate layer
// So that other calls to CrossFade won't affect it.
   leanLeft.layer = 10;
   leanRight.layer = 10;

// Set the lean animation to be additive 混合模式為附加
leanLeft.blendMode = AnimationBlendMode.Additive;
leanRight.blendMode = AnimationBlendMode.Additive;

   // Set the lean animation ClampForever
// With ClampForever animations will not stop
// automatically when reaching the end of the clip
   leanLeft.wrapMode = WrapMode.ClampForever;
   leanRight.wrapMode = WrapMode.ClampForever;

// Enable the animation 和fade it in completely
// We don't use animation.Play here because we manually adjust the time
   // in the Update function.
// Instead we just enable the animation 和set it to full weight
   leanRight.enabled = true;
   leanLeft.enabled = true;
   leanRight.weight = 1.0;
   leanLeft.weight = 1.0;

// For testing just play "walk" animation 和loop it
   animation["walk"].wrapMode = WrapMode.Loop;
   animation.Play("walk");
}

// Every frame just set the normalized time
// based on how much lean we want to apply
function Update () {
   var lean = Input.GetAxis("Horizo​​ntal");
// normalizedTime is 0 at the first frame 和1 at the last frame in the clip
   leanLeft.normalizedTime = -lean;
   leanRight.normalizedTime = lean;
}


提示Tip:
當使用附加動畫時它會判斷你同時也在播放一些其他的使用了附加動畫的非附加動畫(it is critical that you are also playing some other non-additive animation on every transform that is also used in the additive animation ), 否則動畫將添加到最後一幀結果的頂部(animations will add on top of the last frame's result). 這通常不是你所需要的(This is most certainly not what you want).

程序動畫角色Procedurally Animating Characters
有時你需要程序化的驅動你的角色骨骼. 例如你可能需要你的角色的頭注視3d空間的某個點. 這個活最好讓腳本來幹. 幸運的是, Unity做這個很容易. 在Unity中所有骨骼來驅動蒙皮網格(skinned mesh)的變換(Transforms). 因而你可以給角色的骨骼寫腳本,就和其他GameObject一樣.

很重要的一點是動畫系統updates the Transforms 是在Update() function調用之後  ,LateUpdate() function 調用之前. 因而如果你要調用LookAt() function 你應該do that in LateUpdate() to make sure that you are really overriding the animation.
布娃娃系統Ragdolls 也是用同樣的方法製作出來的. 你可以簡單的把剛性物體(Rigidbodies), 角色關節(Character Joints) 和膠囊碰撞體(Capsule Colliders)連接給不同的骨骼. 這樣物理系統就可以作用於蒙皮角色(skinned character). (什麼是布娃娃系統,當你在射擊類游戲中打死對手時可以注意到當角色快接近地面時,他的四肢開始癱軟在地面上,這個不是動畫師調出來的,而是布娃娃系統自動計算出來的。)

動畫重放和取樣Animation Playback 和Sampling
這一部分將說明引擎如何在動畫重放時取樣.

動畫片斷製作時總是有一個特定的速率. 舉例來說, 你可能在Max 或Maya at 創建了一個幀速為60 frames 每秒(fps)的動畫. 當導入Unity後, 輸入模塊將讀取幀速, 所以導入的動畫幀速還是60fps.

可是, 遊戲運行時的速率是不斷變化的. 有的電腦幀速快有的電腦幀速慢, 即使是同一台電腦前一秒和後一秒因為視角的不同幀速也不一樣. 基本上當遊戲開始運行時我們無法確定一個精確的幀速. 這意味著即使我們的動畫片斷製作時是60 fps, 它重放時也許用的是另外一個速率, 例如56.72 fps, 或83.14 fps. 它可以變成任何一個速率.

Unity 對這些變化的速率取樣, 不在於其製作時的速率. 幸運的是,3d電腦圖形動畫不是由分散的動畫組成, 確切地說是由連續的曲線構成的. 這些曲線可以讓我們在任何時間點取樣; 而不是適配某一個原始幀的時間點. I這也意味著如果遊戲運行速率高於原始製作速率, 動作事實上看起來會更平滑流暢.

對絕大多數應用場合,  Unity對變化幀速的採樣我們無需對其進行干預. 可是, 如果你的某個遊戲邏輯所依賴的動畫變化或道具(transforms or properties)結構十分特殊, 那你必須知道這一點.  舉例說, 如果你有一個動畫是把一個物體30幀內從0旋轉到180度, 你想從代碼中得知什麼時候動畫完成一半, 你不能寫一段條件語言來檢查現在旋轉值是不是90度. 因為Unity 依照遊戲的變化速率來對動畫採樣, 它可能在旋轉快到90度時進行採樣, 或者是剛好過90度的時候採樣. 如果你需要通報動畫中一個特殊點到達時,你可以使用AnimationEvent 來替代.

同樣需要注意的是變化的幀速採樣結果, 一個使用WrapMode.Once 模式重放的動畫的採樣不一定是精確的最後一幀( last frame).在遊戲中很有可能是剛好結束前的某一幀, 在下一幀時間可能超過動畫的長度, so it is disabled 和not sampled further. 如果你需要動畫的最後一幀採樣精確,你可以使用WrapMode.ClampForever. 如果是那樣的話動畫將不停的對最後一幀進行採樣直到你自己停止動畫.


2012年7月3日 星期二

UNITY3D - 多點觸控Button


Unity3D自帶的GUI元件並不支援多點觸控,但若針對每個要有多點觸控的Button額外寫程式也很煩人,於是寫了這隻程式,使用方法跟GUI.Button一樣,只是改成用CustomGUI.Button。


public class CustomGUI {

public static bool Button (Rect position, string text) {
GUI.Button(position, text);
position.y = Screen.height - position.y - position.height;

if(Input.GetMouseButtonUp(0) && position.Contains(Input.mousePosition))
{
return true;
}

foreach (Touch touch in Input.touches) {
            if (touch.phase != TouchPhase.Ended && touch.phase != TouchPhase.Canceled)
{
if(position.Contains(touch.position))
{
return true;
}
}
}

return false;
}

public static bool Button (Rect position, Texture image) {
GUI.Button(position, image);
position.y = Screen.height - position.y - position.height;

if(Input.GetMouseButtonUp(0) && position.Contains(Input.mousePosition))
{
return true;
}

foreach (Touch touch in Input.touches) {
            if (touch.phase != TouchPhase.Ended && touch.phase != TouchPhase.Canceled)
{
if(position.Contains(touch.position))
{
return true;
}
}
}

return false;
}

public static bool Button (Rect position, GUIContent content) {
GUI.Button(position, content);
position.y = Screen.height - position.y - position.height;

if(Input.GetMouseButtonUp(0) && position.Contains(Input.mousePosition))
{
return true;
}

foreach (Touch touch in Input.touches) {
            if (touch.phase != TouchPhase.Ended && touch.phase != TouchPhase.Canceled)
{
if(position.Contains(touch.position))
{
return true;
}
}
}

return false;
}

public static bool Button (Rect position, string text, GUIStyle style) {
GUI.Button(position, text, style);
position.y = Screen.height - position.y - position.height;
if(Input.GetMouseButtonUp(0) && position.Contains(Input.mousePosition))
{
return true;
}

foreach (Touch touch in Input.touches) {
            if (touch.phase != TouchPhase.Ended && touch.phase != TouchPhase.Canceled)
{
if(position.Contains(touch.position))
{
return true;
}
}
}

return false;
}

public static bool Button (Rect position, Texture image, GUIStyle style) {
GUI.Button(position, image, style);
position.y = Screen.height - position.y - position.height;

if(Input.GetMouseButtonUp(0) && position.Contains(Input.mousePosition))
{
return true;
}

foreach (Touch touch in Input.touches) {
            if (touch.phase != TouchPhase.Ended && touch.phase != TouchPhase.Canceled)
{
if(position.Contains(touch.position))
{
return true;
}
}
}

return false;
}

public static bool Button (Rect position, GUIContent content, GUIStyle style) {
GUI.Button(position, content, style);
position.y = Screen.height - position.y - position.height;

if(Input.GetMouseButtonUp(0) && position.Contains(Input.mousePosition))
{
return true;
}

foreach (Touch touch in Input.touches) {
            if (touch.phase != TouchPhase.Ended && touch.phase != TouchPhase.Canceled)
{
if(position.Contains(touch.position))
{
return true;
}
}
}

return false;
}
}

UNITY3D - 自動調整GUITexture比例


開發手機、平板電腦遊戲最怕就是各廠商尺寸解析度不同,造成UI被破壞。
若是本來就在OnGUI做UI處理的可以在該程式中處理比例問題,但如果有使用到大量GUITexture,將以下程式附加在EmptyObject上即可將問題處理。

/*******************************************************/
C#
/*******************************************************/
public Vector2 oriScale = new Vector2(1024.0f, 768.0f);

void Start () {
GUITexture[] guis = FindObjectsOfType(typeof(GUITexture)) as GUITexture[];
Vector2 size = new Vector2();
size.x = Screen.width / oriScale.x;
size.y = Screen.height / oriScale.y;
foreach(GUITexture gui in guis)
{
gui.pixelInset = new Rect(gui.pixelInset.x * size.x, gui.pixelInset.y * size.y, gui.pixelInset.width * size.x, gui.pixelInset.height * size.y);
}
}


/*******************************************************/
Javascript
/*******************************************************/


public var oriScale : Vector2 = Vector2(1024.0f, 768.0f);

function Start () {
var guis : GUITexture[] = FindObjectsOfType(typeof(GUITexture));
var size : Vector2;
size.x = Screen.width / 1024.0f;
size.y = Screen.height / 768.0f;
for(var gui : GUITexture in guis)
{
gui.pixelInset = Rect(gui.pixelInset.x * size.x, gui.pixelInset.y * size.y, gui.pixelInset.width * size.x, gui.pixelInset.height * size.y);
}
}


2011年9月22日 星期四

UNITY3D - Javascript繼承

善用繼承可以讓遊戲有更多的變化且減少無意義的COPY&PASTE(?)

U3D的JS繼承用法如下

class Parent {
function Start () {
print("parent's Start");
A();
}

function A () {
print("parent's A");
B();
}

function B () {
print("parent's B");
C();
}


function C () {
print("parent's C");
}

}


class Children extends Parent {

function A () {
print("Children's A");
B();
}


function C () {
super.C();
print("Children's C");
}
}

如果在GameObject上附加Children時會發現此GameObject的執行結果為
parent's Start
Children's A
parent's B
parent's C
Children's C

在寫怪物AI時用繼承的方式會輕鬆很多,底層先寫好每隻怪都會做的動作(移動、攻擊等等),繼承後就可以按不同需求附加個別處理如(特殊攻擊)。

2011年9月15日 星期四

UNITY3D - 圖層觀念

U3D裡面有2D物件也有3D物件,因此要注意物件之間是否會造成顯示異常。

2D世界其實跟3D世界不屬於同一個世界...
可以把2D世界當成是貼在鏡頭前,所以2D物件一定會在介面上擋到3D物件。
而2D世界中的圖片會依據transform.position.z來當作圖層設定,z軸越大表示圖越上面。

例:
A圖片z軸為0
B圖片z軸為1
C圖片z軸為2

呈現出來就會變成
┌───────┐
│        ┌───────┐
│ A    │  ┌───────┐
│        │ B    │        │
└───│  │ C      │
           └───│                   │
                      └───────┘

要注意的是在OnGUI底下畫出來的東西圖層是最高的,所以2D物件也會被OnGUI的東西蓋到喔。

2011年8月31日 星期三

UNITY3D - 2D圖動畫工具


遊戲中常常會用到一些2D連續圖來做UI特效,但是UNITY 3D本身不支援GIF格式的檔案,基於這些需求而寫了以下這隻程式。
目前的功能有:
1.播放一次
2.循環播放
3.淡入
4.淡出
5.放大
6.縮小
7.上升
8.下降

變數功能:
aniplayers :動畫詳細設定
size:有幾段動畫要播放
aniTexture:放連續圖的位置,需依序放入。
playTime:這段動畫的播放時間長度
frequency:時間內播放次數(淡入、淡出、放大、縮小、上升、下降無作用)
playMode:播放模式(播放一次、循環播放、淡入、淡出、放大、縮小、上升、下降)
waitTime:播放後等待時間(循環播放的作用為多久循環一次)
offset:偏移量,放大、縮小、上升、下降的依據
sync:同步,勾選後會跟下一段動畫同步播放
destroy:動畫播放完是否銷毀此GameObject

注意事項:
若勾選destroy時,至少要有一段動畫不能勾選sync

=======================================================================

enum AniPlayMode {PlayOnce,PlayCycle,FadeIn,FadeOut,Magnify,Minify,Up,Down};
class ANIPLAYER {
var aniTexture : Texture[];
@HideInInspector var startTime : float;
var playTime : float;
var frequency : int;
var playMode : AniPlayMode;
var waitTime : float;
var offset : float;
var sync : boolean;
}

var aniplayers : ANIPLAYER[];
var destroy : boolean;

@script RequireComponent (GUITexture)

function OnEnable () {
Play();
}

function Play () {
for(var aniplayer : ANIPLAYER in aniplayers)
{
if(aniplayer.playMode == AniPlayMode.PlayOnce)
{
if(aniplayer.sync)
PlayOnce(aniplayer);
else
yield PlayOnce(aniplayer);
}
else if(aniplayer.playMode == AniPlayMode.PlayCycle)
{
if(aniplayer.sync)
PlayCycle(aniplayer);
else
yield PlayCycle(aniplayer);
}
else if(aniplayer.playMode == AniPlayMode.FadeIn)
{
if(aniplayer.sync)
FadeIn(aniplayer);
else
yield FadeIn(aniplayer);
}
else if(aniplayer.playMode == AniPlayMode.FadeOut)
{
if(aniplayer.sync)
FadeOut(aniplayer);
else
yield FadeOut(aniplayer);
}
else if(aniplayer.playMode == AniPlayMode.Magnify)
{
if(aniplayer.sync)
Magnify(aniplayer);
else
yield Magnify(aniplayer);
}
else if(aniplayer.playMode == AniPlayMode.Minify)
{
if(aniplayer.sync)
Minify(aniplayer);
else
yield Minify(aniplayer);
}
else if(aniplayer.playMode == AniPlayMode.Up)
{
if(aniplayer.sync)
Up(aniplayer);
else
yield Up(aniplayer);
}
else if(aniplayer.playMode == AniPlayMode.Down)
{
if(aniplayer.sync)
Down(aniplayer);
else
yield Down(aniplayer);
}
}
if(destroy)
{
Destroy(gameObject);
}
}

function PlayOnce (aniplayer : ANIPLAYER) {
var index : int;
aniplayer.startTime = 0.0f;
while(aniplayer.startTime <= aniplayer.playTime)
{
index = (aniplayer.startTime * (aniplayer.aniTexture.Length / aniplayer.playTime) * aniplayer.frequency) % aniplayer.aniTexture.Length;
guiTexture.texture = aniplayer.aniTexture[index];
aniplayer.startTime = aniplayer.startTime + Time.deltaTime;
yield;
}
yield WaitForSeconds(aniplayer.waitTime);
}

function PlayCycle (aniplayer : ANIPLAYER) {
var index : int;
aniplayer.startTime = 0.0f;
while(true)
{
while(aniplayer.startTime <= aniplayer.playTime)
{
index = (aniplayer.startTime * (aniplayer.aniTexture.Length / aniplayer.playTime) * aniplayer.frequency) % aniplayer.aniTexture.Length;
guiTexture.texture = aniplayer.aniTexture[index];
aniplayer.startTime = aniplayer.startTime + Time.deltaTime;
yield;
}
yield WaitForSeconds(aniplayer.waitTime);
aniplayer.startTime = 0.0f;
}
}

function FadeIn (aniplayer : ANIPLAYER) {
aniplayer.startTime = 0.0f;
guiTexture.color.a = 0;
while(aniplayer.startTime <= aniplayer.playTime)
{
aniplayer.startTime = aniplayer.startTime + Time.deltaTime;
guiTexture.color.a = guiTexture.color.a + (Time.deltaTime / aniplayer.playTime);
yield;
}
yield WaitForSeconds(aniplayer.waitTime);
}

function FadeOut (aniplayer : ANIPLAYER) {
aniplayer.startTime = 0.0f;
while(aniplayer.startTime <= aniplayer.playTime)
{
aniplayer.startTime = aniplayer.startTime + Time.deltaTime;
guiTexture.color.a = guiTexture.color.a - (Time.deltaTime / aniplayer.playTime);
yield;
}
yield WaitForSeconds(aniplayer.waitTime);
}

function Magnify (aniplayer : ANIPLAYER) {
var scale : float = guiTexture.pixelInset.width / guiTexture.pixelInset.height;
aniplayer.startTime = 0.0f;
while(aniplayer.startTime <= aniplayer.playTime)
{
aniplayer.startTime = aniplayer.startTime + Time.deltaTime;
guiTexture.pixelInset.width = guiTexture.pixelInset.width + Time.deltaTime * aniplayer.offset * scale;
guiTexture.pixelInset.height = guiTexture.pixelInset.height + Time.deltaTime * aniplayer.offset;
guiTexture.pixelInset.x = guiTexture.pixelInset.x - Time.deltaTime * aniplayer.offset * scale / 2;
guiTexture.pixelInset.y = guiTexture.pixelInset.y - Time.deltaTime * aniplayer.offset / 2;
yield;
}
yield WaitForSeconds(aniplayer.waitTime);
}

function Minify (aniplayer : ANIPLAYER) {
var scale : float = guiTexture.pixelInset.width / guiTexture.pixelInset.height;
aniplayer.startTime = 0.0f;
while(aniplayer.startTime <= aniplayer.playTime)
{
aniplayer.startTime = aniplayer.startTime + Time.deltaTime;
guiTexture.pixelInset.width = guiTexture.pixelInset.width - Time.deltaTime * aniplayer.offset * scale;
guiTexture.pixelInset.height = guiTexture.pixelInset.height - Time.deltaTime * aniplayer.offset;
guiTexture.pixelInset.x = guiTexture.pixelInset.x + Time.deltaTime * aniplayer.offset * scale / 2;
guiTexture.pixelInset.y = guiTexture.pixelInset.y + Time.deltaTime * aniplayer.offset / 2;
yield;
}
yield WaitForSeconds(aniplayer.waitTime);
}

function Up (aniplayer : ANIPLAYER) {
aniplayer.startTime = 0.0f;
while(aniplayer.startTime <= aniplayer.playTime)
{
aniplayer.startTime = aniplayer.startTime + Time.deltaTime;
guiTexture.pixelInset.y = guiTexture.pixelInset.y + Time.deltaTime * aniplayer.offset;
yield;
}
yield WaitForSeconds(aniplayer.waitTime);
}

function Down (aniplayer : ANIPLAYER) {
aniplayer.startTime = 0.0f;
while(aniplayer.startTime <= aniplayer.playTime)
{
aniplayer.startTime = aniplayer.startTime + Time.deltaTime;
guiTexture.pixelInset.y = guiTexture.pixelInset.y - Time.deltaTime * aniplayer.offset;
yield;
}
yield WaitForSeconds(aniplayer.waitTime);
}

2011年7月20日 星期三

UNITY3D - 圖片淡入淡出

圖片淡入淡出其實跟GameObject逐漸透明消失的做法類似
只要改圖片本身的透明度就好了
要記得一點是顏色跟透明度的值是(x/256)的float值,不要以為直接塞1~256的值就可以...

圖片淡入
=========================================================================
function Start ()
{
guiTexture.color.a = 0; //讓圖片一開始為透明
}

function Update ()
{
if(guiTexture.color.a < 1)
{
guiTexture.color.a = guiTexture.color.a + Time.deltaTime; //讓圖片隨時間變不透明
}
}


=========================================================================

畫面淡出
=========================================================================

function Start ()
{
guiTexture.color.a = 1; //讓圖片一開始為不透明
}

function Update ()
{
if(guiTexture.color.a < 1) 
{
guiTexture.color.a = guiTexture.color.a - Time.deltaTime; //讓圖片隨時間變透明
}
}

=========================================================================

2011年7月13日 星期三

UNITY3D - 連續貼圖

U3D不支援顯示gif檔案,但是我們可以利用程式來將一連串的靜態圖片顯示得跟動態圖片無異。
首先建立一個empty object然後加入下面component script。

=======================================================================
var aTexture : Texture[]; //靜態圖片組
var framePerSecond : int; //每秒播放張數
var x : int; //x軸位置(以pixel為單位)
var y : int; //y軸位置(以pixel為單位)
private var startTime : float;
function Start () {
    startTime = Time.time; //記錄開始時間,確保圖從第一張開始放。
}
function OnGUI () {
    var index : int = ((Time.time - startTime) * framePerSecond) % aTexture.Length;
    GUI.DrawTexture(Rect(x, y, aTexture[index].width, aTexture[index].height), aTexture[index], ScaleMode.StretchToFill, true, 0);
}

=======================================================================
加入component後將靜態圖按順序設給aTexture以及設定framePerSecond與XY軸就可以看到在設好的(x,y)上顯示靜態圖片組成的動畫了。

2011年7月3日 星期日

UNITY3D - GameObject逐漸透明消失

private var startTime : float;
private var alpha : float = 255.0f;

function Start () {
startTime = Time.time;
}

function Update () {
    if((Time.time - startTime) > 5)
    {
    var render = gameObject.GetComponentInChildren(Renderer);
    alpha = alpha - 10.0f;
    render.material.color.a = alpha / 255.0f;
    if(render.material.color.a <= 0)
    Destroy(gameObject);
    }
}
用處:用在怪被打死後逐漸消失。

以上程式功能為物件產生出來後經過5秒,然後將render的透明度逐漸遞減,當透明度低於0則清除此物件。注:Material的Shader必須用允許透明的Shader。

2011年6月30日 星期四

UNITY3D - 畫面震動效果

遊戲設計其實跟電影拍攝的概念很類似,構成電影最基本的元素是導演、攝影師、劇本、演員,而構成遊戲的最基本元素是鏡頭(導演、攝影師)、角色與NPC設定(劇本、演員)。

角色與NPC設定屬於控制與AI的設計,有賴於程設的構思去完善。相信很多人都會忽略鏡頭的重要性,但其實鏡頭就如同導演一般,要負責的東西多又繁雜且細膩。簡單來說...畫面上看到的東西都是鏡頭負責的(好像是廢話),舉凡玩家視角、遊戲介面、選單、畫面特效(震動、畫面變色)等等都是用鏡頭來呈現。

畫面震動的效果其實說穿了也沒什麼...不就是鏡頭晃一下就好了?以下是javascript code,附加到鏡頭上試試效果吧。
var shakePower : float = 2.0f; //設定震動的幅度
var shakeDelay : float = 0.05f; //設定震動的間隔時間

function UpDownShake () //上下震動
{
transform.Translate(Vector3.up * shakePower);
yield WaitForSeconds(shakeDelay);
transform.Translate(Vector3.up * -shakePower);
}

function LeftRightShake () //左右震動

{
transform.Translate(Vector3.right * -shakePower);
yield WaitForSeconds(shakeDelay);
transform.Translate(Vector3.right * shakePower);
}

function ForwardBackShake () //前後震動
{
transform.Translate(Vector3.forward * shakePower);
yield WaitForSeconds(shakeDelay);
transform.Translate(Vector3.forward * -shakePower);
}

function XRotateShake () //X軸晃動
{
transform.Rotate(Vector3.right * shakeAngle);
yield WaitForSeconds(shakeDelay);
transform.Rotate(Vector3.right * -shakeAngle);
}

function YRotateShake () //Y軸晃動
{
transform.Rotate(Vector3.up * shakeAngle);
yield WaitForSeconds(shakeDelay);
transform.Rotate(Vector3.up * -shakeAngle);
}

function ZRotateShake () //Z軸晃動
{
transform.Rotate(Vector3.foward * shakeAngle);
yield WaitForSeconds(shakeDelay);
transform.Rotate(Vector3.foward * -shakeAngle);
}

function Update ()
{
if(Input.GetKeyDown(KeyCode.Keypad1)) { StartCoroutine("UpDownShake"); }
if(Input.GetKeyDown(KeyCode.Keypad2)) { StartCoroutine("LeftRightShake"); }
if(Input.GetKeyDown(KeyCode.Keypad3)) { StartCoroutine("ForwardBackShake"); }
if(Input.GetKeyDown(KeyCode.Keypad4)) { StartCoroutine("XRotateShake"); }
if(Input.GetKeyDown(KeyCode.Keypad5)) { StartCoroutine("YRotateShake"); }
if(Input.GetKeyDown(KeyCode.Keypad6)) { StartCoroutine("YRotateShake"); }
}

UNITY3D - 控制輸入設定

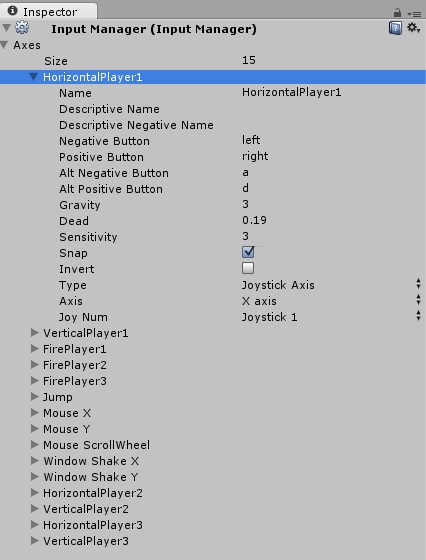
輸入控制是遊戲最基本的部分,那U3D要怎麼設定輸入控制呢?
首先我們開啟Edit->Project Settings->Input就可以看到Inspector視窗呈現類似的畫面
Axes底下就是各按鍵設定,如果有想要增加按鍵數量的話可以加大Size就會看到下面的按鍵數量增加。
每個按鍵下面都有以下屬性:
Name:用來定義按鍵的名稱,關係到程式呼叫時的對應。
Descriptive Name:玩家在更改輸入控制畫面看到的名字。
Descriptive Negative Name:玩家在更改輸入控制畫面看到的名字(通常為方向控制)。
Negative Button:此輸入所對應的按鍵(通常為方向控制才有用到),程式中取到的值為-1~0。
Positive Button:此輸入所對應的按鍵,程式中取到的值為0~1。
Alt Negative Button:此輸入所對應的替代按鍵(通常為方向控制才有用到),程式中取到的值為-1~0。
Alt Positive Button:此輸入所對應的替代按鍵,程式中取到的值為0~1。
Gravity:設置按鍵恢復的速度。
Dead:調節類比訊號的敏感度(如類比搖桿)。
Sensitivity:調節數位訊號的敏感度。
Snap:勾選後,按反向鍵時會先將數值歸零。
Invert:勾選後,對應的按鍵會相反(通常用於飛行遊戲)。
Type:按鍵的輸入型態(若要改用遊戲手把記得更改此項)。
Axis:此按鍵的軸向。
Joy Num:設定為第幾個手把(若是用遊戲手把的話)。


程式部分:

Input.GetKey (name : string) : bool

用於檢查某特定按鍵是否被按,跟Input的設定無關,會被連續偵測到。

Input.GetKeyDown (name : string) : bool


用於檢查某特定按鍵是否被按下,跟Input的設定無關,只有在被按下的時候才觸發,按鍵不放開重按則無效。

Input.GetKeyUp (name : string) : bool

用於檢查某特定按鍵是否被按下,跟Input的設定無關,只有在被放開的時候才觸發。

Input.GetButton (buttonName : string) : bool

一樣是用來檢查按鍵是否被按,buttonName是Input所設定的名字,會被連續偵測到。

Input.GetButtonDown (buttonName : string) : bool

一樣是用來檢查按鍵是否被按,buttonName是Input所設定的名字,只有在被按下的時候才觸發,按鍵不放開重按則無效。

Input.GetButtonUp (buttonName : string) : bool

一樣是用來檢查按鍵是否被按,buttonName是Input所設定的名字,只有在被放開的時候才觸發。

Input.GetAxis (axisName : string) : float

通常用於方向鍵偵測,回傳值為-1~1,跟Input的設定息息相關。

還有其他的函式可以用,但相信這些就很夠了...